Pages

Friday, September 23, 2016

Exploring eastern Washington grain elevators

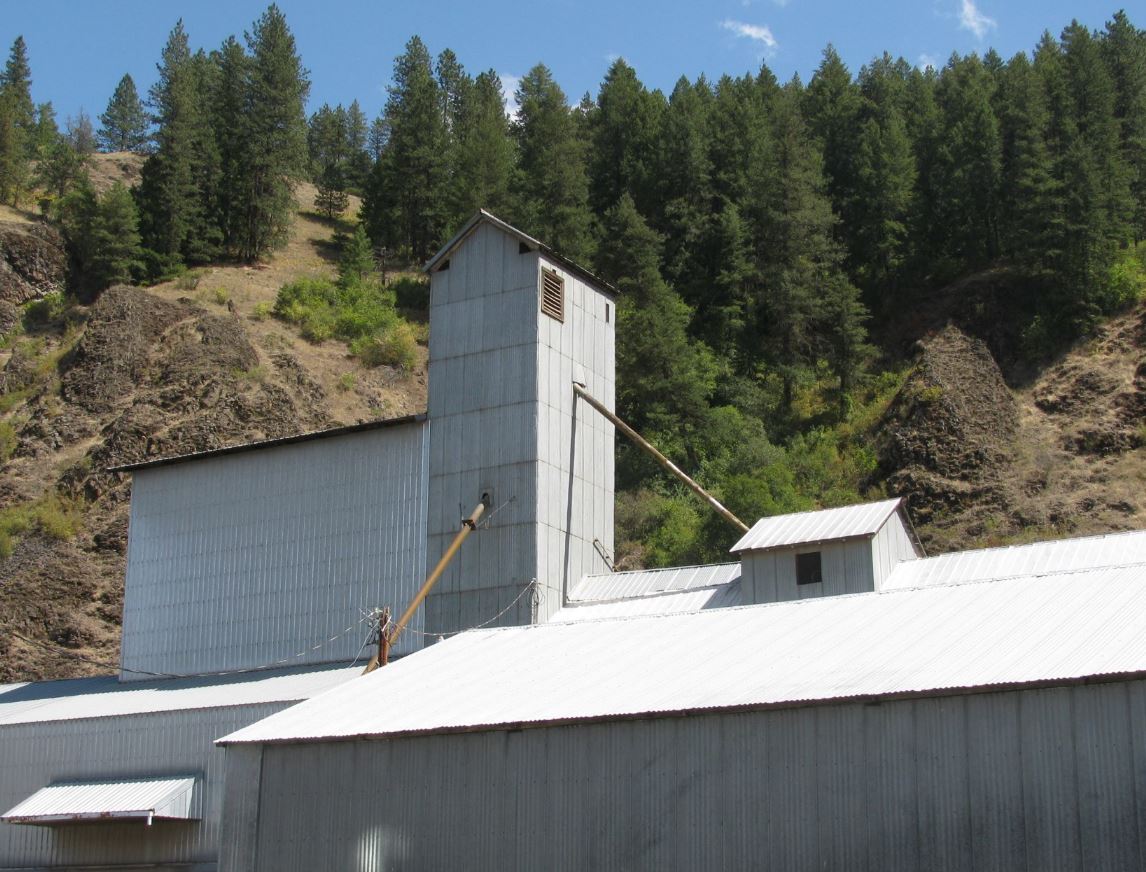
When I decided on a theme for the PE&A I knew that I absolutely would need a grain elevator. Not a big terminal elevator like you would find at shipping ports, but a small collector elevator like those found in railroad towns along every branch line across the Palouse. As every grain elevator is so unique, this summer I started collecting photos of grains elevators that caught my eye during my travels which I could potentially use for modeling.
Part of the massive grain elevator facility at Ritzville, Wash.

Along every railroad line through the Palouse the largest structure at each railroad station or siding would typically be a wood-cribbed grain elevator, sometimes painted, other times sided with corrugated steel to protect the structure (and its contents) from the elements. These were located along the main track or a siding, depending on the branch traffic, with the railroad on one side of the building and a wagon/truck driveway on the other side along with an office. Over time, as volume of grain production increased, the original structures were expanded or separate structures were built nearby. As various structures were added at different times, different construction methods from different periods of history can be seen today at a single site.

As a result there is an incredible variety of forms and structures and it is nearly impossible to find two grain elevators that exactly match. One can find amazing beauty in these utilitarian structures.

A view of the Uniontown, Wash. facility showing many different styles of building from different eras. Rail service, when it existed, was on the far side of the building from the viewer.

In places where steel rails have been gone for decades, some elevators have been abandoned and allowed to deteriorate, while other elevators continue to operate but the grain no longer leaves town on rail. Instead, the grain is transferred by truck to a larger elevator with at a rail shipping point or a barge shipping terminal along the Snake River.
Dayton, Wash. has a huge facility. This picture shows a couple of the older elevator buildings.

Another view of Dayton, Wash. showing more modern structures, including part of the huge slip-formed concrete structure. Dayton still has active rail service; tracks are owned today by the local port authority.

I don’t yet know exactly what my grain elevator will look like, but I know I want a classic wood cribbed elevator with at least a couple of attached lean-to structures and some supplemental grain bins. Of course, there is no need for me to design the entire thing up front, as I can always add on to it over time just like a real elevator.

Enjoy the elevator pictures. This certainly isn’t a comprehensive study – just a small smaple of a few that I happened to cross paths with that were appealing to me.

This simple and classic elevator at Joel, Idaho may be a great one to model. The original building has a stepped back headhouse which I find attractive, plus there are two annexes, one an older riveted steel tank, and the other a more modern corrugated steel bin. Rail service, when it existed, was along the side of the building facing the viewer.

Davenport, Wash.
Detail view of the headhouse of an elevator in Harrington, Wash.
Reardon, Wash.
Another view at Reardon, Wash. Rail cars are being loaded just to the right of the photo.

This elevator in Colfax, Wash. had a couple of weathered lean-to structures that look like they may have been added at separate times.
The corrugated steel siding has partially peeled away from this elevator in Johnson, Wash.
Troy, Idaho.
A long series of riveted steel plate bins in Kendrick, Idaho. 
Another elevator in Kendrick, Idaho.

Palouse, Wash.

Lapwai, Idaho.
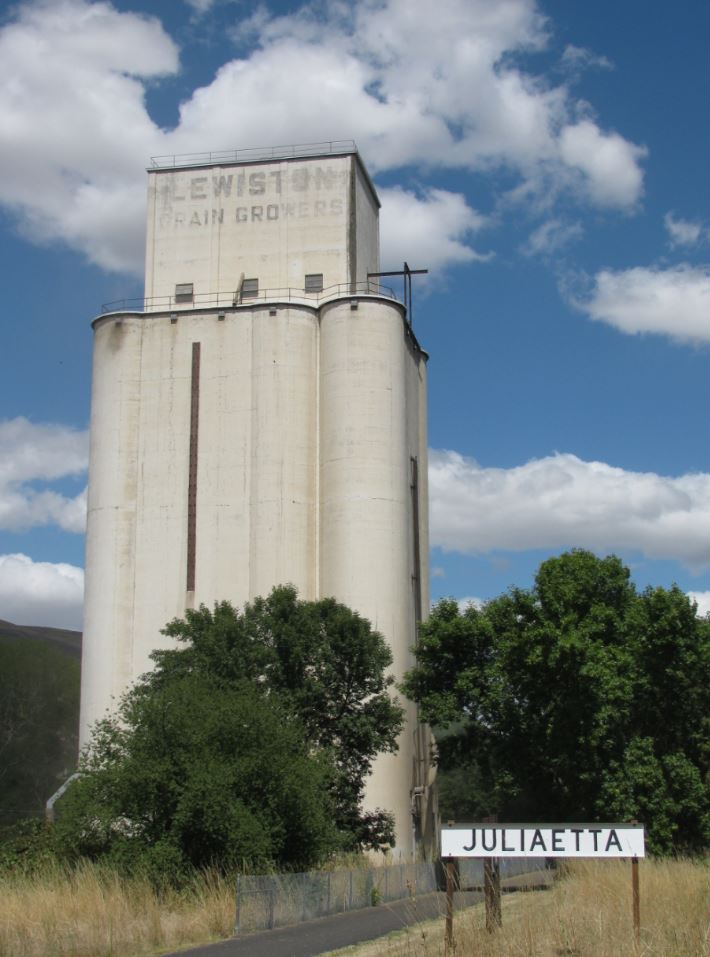
Rails to trails in Juliaetta, Idaho. This line was built by Northern Pacific and serves as a multi-purpose trail today, providing a great view of the slip-formed concrete grain elevator.

The small elevator structure near Chambers, Wash. has been abandoned and is gradually falling down, piece by piece.

Tuesday, September 20, 2016

Rolling stock: Box cars GN 46006 and OSL 189777

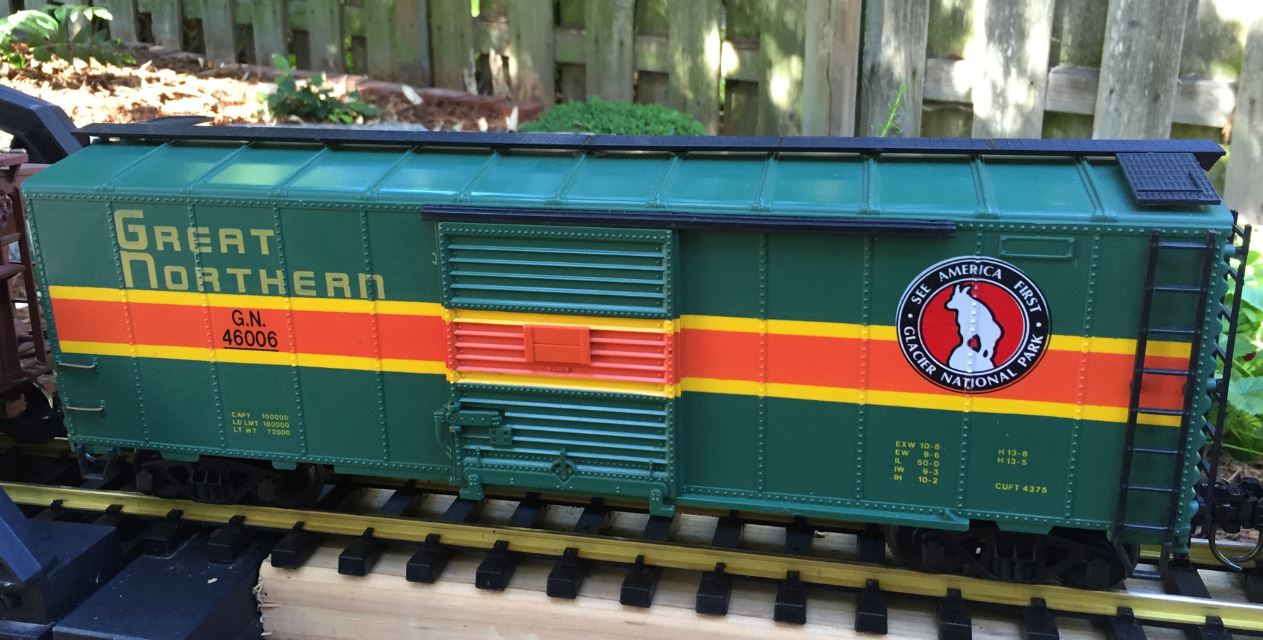
I’ve recently acquired a few more pieces of rolling stock for my collection including a couple of used box cars made by Aristocraft. These are essentially identical cars except for the paint as they’re from the same mold, but interestingly one is labeled as a 50’ box car and the other is labeled as 40’.

I want to own at least one car from each of the four railroads that merged to form Burlington Northern in 1970, and I thought GN 46006 would be a nice addition even if it isn’t historically accurate. The colorful Great Northern paint scheme you see here was used on passenger train equipment starting in 1947 but not on freight equipment, although I suppose a box car might have had this paint scheme if it was intended for use in a passenger train. Another thing to note is the version of the Great Northern logo on this car is more like what you would have seen in the 1920’s or 1930’s, not mid-century. So it seems unlikely that a box car painted like this existed, but it is very pretty nonetheless.

Great Northern box car GN 46006

As I also have a Union Pacific locomotive I want to acquire a few UP cars as well. I liked this particular UP box car as it uses OSL, the reporting mark for Oregon Short Line, a wholly owned subsidiary of the Union Pacific that was anything but short. The OSL was created by UP to connect the UP main line at Granger, Wyo. to the Oregon Railway & Navigation Co. main line at Huntington, Ore. (You may recall from previous posts that the OR&N was the railroad that built through Elberton). The OSL grew through extensions, mergers and name changes to over 2,400 miles by 1936. It was not fully incorporated into the UP until 1987 so the OSL reporting mark was seen on cars through much of the 20th century.

Union Pacific / Oregon Short Line box car OSL 189777
The UP car is missing a ladder but otherwise these two car bodies are in perfect shape. I can tell from the wear on the trucks that the GN car did have some mileage, and when changing out the wheels I broke one of the trucks as the plastic had become so brittle. So I ended up completely replacing the trucks on the GN car as well as replacing couplers, while the UP car only needed new couplers. 

Outdoor construction on the PE&A has essentially wrapped up for the season. I finished the second of the two drop-girder spans and I’ve continued to do some landscaping work so the railroad is all set for the rainy season. The next big construction projects are concrete piers for the bridges, the wooden trestle work along the east loop, and a spur into the garage where the train yard will be located. These outdoor projects will likely wait until spring for construction. Over the winter I’ll be doing inside projects such as designing the freight yard, building trestle bents, converting one or more of my locomotives to radio control and battery power, and possibly building a couple more structures such as a barn and a grain elevator. All of this activity, of course, will be covered in this blog.

Bridge complete with both drop girder approaches. Total bridge length is just under eight feet (240 feet in 1:29 scale).

Sunday, September 4, 2016

Inland Northwest Rail Museum Opens

I’ve been roaming through eastern Washington a few times this summer and my most recent trip included a visit to the newly opened Inland Northwest Rail Museum outside of Reardon, about 25 miles west of downtown Spokane. This new museum grew out of a local chapter of the National Railway Historical Society (NRHS) that originally formed almost 50 years ago. In 2002 they started looking for a new site for their extensive collection of rail cars and decided on a 30 acre parcel outside of Reardon along U.S. Highway 2. They built a spur off an active rail line that was originally Northern Pacific’s Central Washington branch, built in 1888-89, and today operated by a short line called Eastern Washington Gateway Railroad.

View of the museum site from the south
Looking east from the the upper level of the shop building. You can see the spur from the main track crossing the road, and Reardon is in the distance.

The museum aims to preserve the history of all of the railroads that operated throughout the Inland Empire and has a great master plan to develop the site over time as they are financially able to. An extensive amount of work has occurred just to get to where they are today, including a spur line and highway crossing to access the site, a few thousand feet of track to store the museum’s collection, installation of a turntable, not to mention less glamorous but necessary things such as a water well, fire hydrants, septic system and security fencing. The key feature that allowed the museum to open last week was finishing the 12,000 sq. ft. restoration and maintenance shop, which will also house the museum and gift shop until another structure is built in a future phase.

Railroads were incredibly important in the history of Spokane and it is exciting that the Inland Empire will have a first class museum to share that story. I can’t wait to see how this museum grows in the future. Do visit them if you have a chance -- for now, they plan to be open Fridays, Saturdays and Sundays through the end of October.

A key piece of the collection is this Brill street car built in 1906 for the Washington Water Power Company, the only remaining street car from Spokane's once extensive street car system. It has been extensively and lovingly restored.
The turntable is in place and balanced on its pivot. Eventually a round house will be built around this turntable.
An EMD F9 originally built for the Northern Pacific in 1956.
A 40-foot box car with Spokane, Portland & Seattle livery. I definitely need to get one of these for my railroad.

A Great Northern baggage car that also included space for Railway Express Agency.
A view of the shop with a Great Northern caboose in front.
A diner car built for Union Pacific in 1914.
I'm not sure what this portable steam engine was designed or used for, but it sure looks nice!
What would a trip to a train museum be without a ride on a train? The museum has installed a 3/4-mile long 2-foot gauge track and has a small diesel locomotive pulling a few passenger cars. The track work is still in progress but it is usable—just hold on tight!
Just for fun, here is a map likely from 1890 or 1891 showing railroad lines in the area south and west of Spokane. I've highlighted Reardon, Palouse and Elberton so you can see their relative locations.


Friday, August 26, 2016

Late August update: Drop girder bridge, dry creek bed

The first of the two drop girder bridge segments is now complete and in place next to the Warren truss bridge. It is 24 inches long (58 scale feet) and a second identical one will be placed on the other side of the truss bridge -- it was delayed as I had not purchased enough supplies to finish both. I think it looks absolutely perfect next to the truss bridge, especially now that they are now painted to match. The bricks, as I mentioned earlier, are just temporary supports and will eventually be replaced by concrete piers.


Here is a close-up showing the end cross section. Normally a drop girder bridge like this would consist of two long girders that were connected by multiple cross braces, not a solid top and bottom which is used here to provide more support for the weight of the train. So this bridge segment only looks realistic from the side view, which is what the viewer will see.


This was my first experience building with styrene which I found to be much more difficult to work with than wood. But in this case the styrene is significantly stronger, should be more durable, and provides far more detail than wood, so it is worth the effort for this bridge. For buildings, however, I'll probably stick to wood. The design and plan for this bridge came from John Morrison's 2012 PSGRS Clinic "Bridges: How to Build a Simple Span Using Styrene" (members can find this in the online PSGRS Library under the 2012 clinics).

Also this week I finished building the dry creek bed down slope to the fence line. Here's a photo of the work in progress as I was stockpiling rocks, some of which had a beautiful coat of moss. I wanted to use only rounded river rocks for this feature and was surprised by how many I was able to find as I was looking around the yard, many of which were overgrown with vegetation and long forgotten. Most of these rounded rocks originally came from the Nisqually River near Elbe.


Once I had boulders in place I created an even slope for the creek bed and then covered it using 7/8" river rock like I had used earlier. Note that I also put some more substantial supports on either side of the temporary bridge so that I could remove the middle PVC support which looked funny coming down right in the middle of the creek bed.


Here is a broader view showing the entire east end. I've decided to place my grain elevator, once I build it, next to the tangent on the right side of the photo.


And here's a picture of Alki checking out the trees in the new landscaping. Somewhere new to pee!


Dead mole. How can this little thing move up to 40 pounds of dirt in one night?


Monday, August 22, 2016

East loop complete

Yesterday I finished the east loop, which means all the track is now connected in a single path and I can run trains again continuously. I had an idea of how this loop would look but was not sure exactly where it would be, so there was some experimentation as I moved the track around to see what would look best and fit best in the constraints of the space.

I started by placing wooden stakes as a temporary support just to hold the track up. This allowed me to check and adjust the alignment and slope until it looked right.


Once I was satisfied with the line placement, I put in a number of two-legged supports using half-inch PVC and 90° angle joints. These are sturdy enough to support trains for now but this is just a temporary solution. My plan is to replace this with a wooden trestle and some type of bridge that will cross over the ravine. In the middle of the photo below, there is half-inch board under the track approximately where the bridge will go.


Here's another perspective of the completed east loop. In the foreground where the bricks are I will build up an embankment and the trestle work will probably start about where the last bricks are on the right.


In other work, the painted Warren truss bridge is back in place, looking great.


And I've ballasted the track in the plate girder bridge.

Friday, August 19, 2016

New siding in place

A new siding is now in place on the flat area between the two bridges. It's not a very long siding -- just room enough for two cars or maybe three if they aren't long. You might notice that a little more landscaping is now in place -- I'm taking plants out of their pots and getting them back in the soil now that I've decided where they should go.


In the upper right of the photo above you can catch a glimpse of the plate girder bridge. It's now painted black, the color typically used by the Northern Pacific on steel bridges on the Palouse. I used a combination of different spray paints to try and give it a weathered metal look. Next I'd like to stencil in PE&A RR on the side, probably in white.


I like the finished look of the plate girder bridge, so I've temporarily pulled out the Warren curved-top-chord through truss bridge and it's in the paint shop now. The weather is hot and dry so it's a good time for painting.


I've also extended the track beyond the 30-degree at-grade crossing. It's still just a stub while I'm figuring out exactly how it will loop around to meet the upper level track.


Finally, here's a short video of a BN consist out on a test run. I was having some problems with track power and finally got it fixed this week, so trains are up and running again.


Sunday, August 14, 2016

Sweet victory at last

"The mole is dead," announced a weary looking Lt. Gen. A. Dahlia, commander of the Mole Eradication Joint Forces. “Our eight-week long battle has at last reached its conclusion with the death of the mole yesterday afternoon, August 13, sometime between 3:00 and 5:30 pm Pacific time. From this day forward we will remember August 13 as V-M day when our long fought efforts brought to close this dark period in the history of our garden."

The mole first appeared the third week of June. And while most moles are commonly dispatched within 72 hours, early efforts to eradicate this mole proved fruitless. By early July the extent of damage it was creating on a nightly basis had brought construction on the Palouse, Elberton and Ainsworth Railroad to a halt, and it was not long before comparisons to the mole of 2004 could be heard. According to one local man, "Back in aught-four we really did refer to molehills as mountains as that’s how big they were. I never thought I'd live to see another mole as bad as that one."

Director of Garden Planning H. A. Perovskia was circumspect. "Moles come and go, but we hadn’t seen this level of destruction in many years. It's hard to put into words how frustrating and demoralizing this experience has been. There are times that I felt that further work in the garden was pointless – why put in effort only to see your work ripped out that night?

"The destruction of the new iris bed was especially hard," he continued. "We had to rescue the damaged rhizomes and essentially start over from scratch, knowing that the mole could tear through the iris bed again at any moment. And the path by the bird feeders was especially hard hit and will require a major rebuild – I don’t know how long that will take."
One of many recently patched spots visible on the lawn at mid-day today.
This patch is at the site where the mole was finally trapped.
Hard effort pays off

The MEJF commander provided some additional detail when asked about how the victory was won.

"Over the past two weeks mole activity had shifted away from the eastern front and appeared to be centered under the new patio,” explained Lt. Gen. Dahlia. “We focused our forces on the perimeter, installing and shifting traps around the patio two or three times a day. Last night, the diligent efforts of our fighting men and women finally paid off."

Time for healing

Now that the battle has been won, efforts have shifted to recovery and repair. "After a battle like this the wounds can run quite deep – eight to 12 inches, in fact," said Director Perovskia. "Other wounds are more superficial and can be fixed more quickly. Fortunately its still early enough in the season that we can get new grass started. We were out just this morning working on lawn patching,"

MEJF crews began demobilization of the mole traps this morning and they were followed by garden repair crews to start work on some of the more visible damage. By mid-day newly seeded and watered lawn patches could be seen across the garden.

"It’s amazing to see how quickly we have shifted our efforts to recovery, now that we know the enemy is dead," said Director Perovskia. "Of course, the return of the fall rains will likely bring to light additional damage, as weakened tunnels cave in and require fixing." Repairing all the damage is expected to continue into next spring.

Thursday, August 11, 2016

New tractor and livestock

The latest package to arrive included some livestock and a tractor! Here is a picture of 1:29 Daric standing in front of his 1965 Massey Ferguson 825.


And here is 1:29 Daric out by the livestock stable with the horses.


Alki is nonplussed by the new additions and continues to block the right-of-way.

Tuesday, August 2, 2016

Early August update on progress

I haven't had a post recently but that doesn't mean progress has stopped. The mole(s) are still present but the activity has dropped considerably. I've continued to pursue it (or them) relentlessly and will not rest until I've achieved victory. In the meantime, as there is little mole activity in the immediate train area, I'm moving forward.

I realize I won't be able to complete everything this summer as much as I want to. So I've decided that in some places I will be installing temporary track support that will be replaced over time. My short-term goal is to get all the track in place and be able to run trains.

For example, I haven't built piers for my bridge and I'm still using a pile of bricks instead. The approach on each side of the bridge is nothing more than two-foot long 2x4. I will eventually replace these approaches with drop-girder bridges which I'm planning to build myself out of styrene. Once those are ready, I'll then create custom piers, likely out of poured concrete. I'll probably need to build some cribbing as well.


I have rerouted the track through the tunnel


Here's another picture of the same area from a different angle, showing the grade separation between the two tracks and the temporary support structure I have in place for the upper track that will eventually be replaced. The bricks are temporary as well.


The track is in place on the loop around the tree.


This through-girder bridge just arrived yesterday from SplitJaw Products. I'll eventually need to build a support pier on the east end; on the west end I plan on building a support anchored on the concrete blocks. I don't have track over the bridge yet but I will after it arrives later this week. I will also get this bridge painted before then, and will paint my other bridges in a similar style so they match.


I also built a little shack with a front porch and an out building for 1:29 Daric. These structures are actually about 1:24 scale, so they should feel quite roomy. These were built using lumber and plans from Smith Pond Junction Railroad Products.


Alki taking a timeout and enjoying the the sun on the moss carpet. Good thing there aren't any trains running as his paws are blocking the tracks!