Pages

Monday, May 25, 2020

Trestle Part 1: Manufacturing trestle bents

As this was a three-day weekend I had a little extra time so I started work on a long overdue project, building a wooden trestle for an elevated section of track that has, for the over three years, been sitting on top of PVC pipes. Here is a link to my blog post from August, 2016 when I first put this in and it has held up incredibly well with almost no settling and very little maintenance. It may look ridiculous, but the PVC solution was amazingly durable.

A train heads downhill across the elevated east loop.


I haven't built a wooden trestle before, but I've watched some videos online and trestles seem relatively straightforward, especially when they are straight and have a consistent height. But in my case the trestle will be on a curve. And on an incline. And the ground is uneven. And there is a bit of superelevation to take into account on the curves. It will be a challenge but I've put this off long enough.

Given the number of variables I determined that drawing up a precise plan just wasn't an option for me. I really need to build the trestle in situ and adjust as I'm going to what looks right to the viewer. I don't yet know what my spacing between bents will be so I don't know how many I'll need, but I figured I'd just make a bunch to get me started and I can always make more later if needed.

As you can see from the first photo, the trestle will not be very high off the ground. The highest bents will only need to be about 14 inches tall, and most will be about 8–10 inches. I decided to partially prefabricate the bents, and then custom finish each one as I figure out how tall each will be.

First step is to set up my shop. The cars were banished from the garage for a day and a night. Check out that brand new garage door—it was just installed last month.

Next up is designing a jig to ensure that all the trestles end up the same. This photo shows more or less what I want the finished bent to look like. Given that my trestle will be rather short, I'm creating a simple four-post bent where the two center posts are both vertical and the two side posts are angled out. If I were building a taller trestle I would likely have gone with a five-post or even a six-post bent, as the additional posts add visual complexity and depth.

Once I had everything lined up exactly where I wanted it I placed spacers on each side of each post which I secured in place with glue and small nails.

And that's all there is to it. Note the horizontal lines showing the center line of the top board (the cap), the center line for another board seven inches below (the sill), and the bottom line is at 14 inches from the top, indicating what I think will be my maximum height.  

I already had more than enough posts cut up. But I hadn't yet cut up any boards to use for the cross pieces. The posts are about 1/2-inch square; the boards connecting them will be a 1/2-inch by 1/4-inch. Give or take.

Before I could cut 1/4" strips I realized I needed to add a lower profile guide to my table saw. I decided to glue it on and then secure it with a few screws.

Here is the guide in place on the table saw to allow for 1/4-inch strips.

Before ripping...

...and after.

Next I needed to cut the long strips into boards. Using the jig as a guide, I decided the cap boards would be 7", the sill boards would by 8 1/4", and the sway braces (the diagonal between the cap and sill) would be 8 3/4". 

Finished piles of each board length. Time to build some bents!

Step 1: Place posts in jig and make sure they are all pressed up against the stop board at top.

Step 2: Dab some outdoor wood glue on each post where boards will be attached. If you look carefully, you can see I've marked in pencil the spots where the glue is needed for the sway brace.

Step 3: Place board on glue, and secure to each post with a brad gun. I did the cap and sill first, then the sway brace. This brad gun wasn't quite up to the task—even at full power it couldn't quite get the brads all the way in, so I had to finish them off with a quick tap from a hammer.

Step 4: Once all three boards are secured, gently pull the bent out of the jig.

Step 5: Flip the bent over and repeat steps 2–4 on the other side. A jig isn't needed for this, but I did make some pencil marks on the working surface to help guide my glue dabbing.

A pile of partially finished bents. Note that the posts are sticking out above the cap which is intentional. And the length of the posts varies, which is fine as I'll be cutting the posts off once I determine the height for each bent as it is placed. At that time I'll also be adding another sill at the bottom (the mud sill) and two more sway braces. 

After letting the bents sit for over night so the glue could dry, I then sawed off the tops of the posts flush with the cap by running them through the table saw.

The bearded iris are looking great right now, even in the rain.


Sunday, May 17, 2020

Installation of new retaining wall

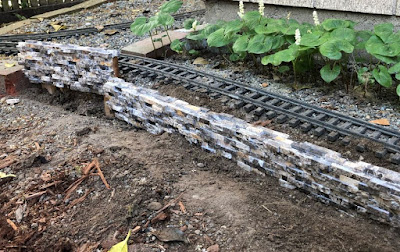
This week I finished up the new retaining wall that I mentioned in the post last week. The ballast washes out here every winter so this should help keep it in place. I built this in a similar way to the retaining walls I built last year, using a cut stone tile on a wood structure.

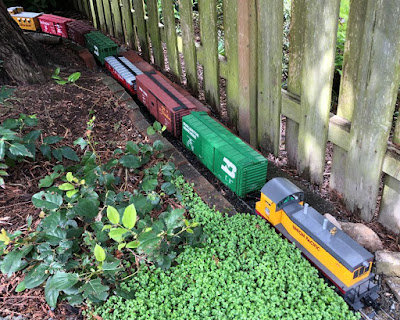
Mixed freight train out for a run to test out the new track.

Prior to starting I dug out a trench where the wall would be placed so I could visualize about how high it would need to be.

To accommodate the curve in the track, I used a three-foot and a one-foot section of wall. In order to provide some stability I attached it to some wood stakes that I could drive into the ground.

The next step was to cut the stone tile sheet into strips and attach it to the wood using a tile adhesive. I did this on just the top and the side facing the viewer.

After curing for three days, I applied a wood sealant on the exposed wood, and a stone tile sealant on the stone surfaces. Then after another day to allow those to dry, I lined up the two walls to determine exactly where I wanted them placed.

Things did not go exactly as planned. One of the stakes actually split as I was driving the wall into the ground. But the other four stakes held in place.

I put the longer wall in first and made sure it was at the proper elevation and completely level. Then came the hard part, driving n the second wall at an angle and then nudging it into place. I had interlocking stones that needed to line up so the two walls had to be completely aligned.

Here's a close up showing the joint where the two walls come together. It looks pretty good.

The next step was to back fill the wall, put down new ballast on top, and then clean up the area in front of the wall.

And finally the PE&A is ready to run trains again.


Here the train is passing along the fence where the track was repaired in the last post.

The train is passing over the dry creek bed.

All the allium opened this week.

Sunday, May 10, 2020

New trench

Today I shored up the road bed along the fence so it is in operable condition again. And I'm hopeful that this solution should provide some stability and last for a long time. I'm still not quite ready to run trains as I want to finish up the new retaining wall near the garage first. I should have that done sometime this week.

This is the before shot. The ballast is completely washed out on the left side and the road bed and the slope has partially slumped. The track is twisted and leaning downhill.

My initial thought was to install some simple boards to just stop the soil from moving. But when I started digging out the slope I quickly realized that wouldn't work at all, as I had forgotten about all the large rocks and concrete chunks I had put down underneath the roadbed for stability four years ago. Perhaps if I had looked at old pictures (i.e., this blog) I would have remembered.

So I switched gears and instead focused on building up wall on top of the concrete blocks that were already in place underneath. After clearing loose material out of the way I started placing large rocks and concrete cobbles that I had around.

And then I switched to using a double layer of bricks. As these are sitting on top of concrete blocks, not on the soil, they should be quite stable.

This is a view looking the other way showing the track in its new trench. I backfilled with the material I had cleared out of the way as it was still pretty clean. I then put fresh quarter-minus ballast on top.

Here is the after shot, with the new ballast but before I sprayed it down with water to lock it in place. The track has been leveled and aligned. It hasn't looked this good in ages!

And here is a final picture looking the other direction. Compare this to the picture at the beginning of the post.

I noticed today that another one of my native irises is blooming. This one is a rather compact plant and has very small flowers.

And for a final picture, the red hot poker is in peak bloom right now and lots of bees are visiting.

Saturday, May 9, 2020

Clean up and needed road repairs

Here we are in the second week of May already and this is my first post of the year. I still haven't been able to run trains on the PE&A this year due to damage over the winter. Earlier this spring I did some initial cleanup but it took until this week to finally get to work with putting in new ballast where it had washed out. I also cleaned up plantings and spread bark in open areas. The entire railroad is now ready to run trains except for one 10-foot tangent along the fence where the erosion has been extensive and I need to find a solution to hold the soil in place. I'm going to work on building a new retaining wall between the railroad and the fence, something I should have done earlier..

Getting ready for a new season of running trains. Better late than never.

This area along the garage usually sees some erosion and it isn't too bad this year. I'm going to build a small retaining wall as I think it will look good here and help stop the erosion.

A close up of the false lily of the valley (DescriptionMaianthemum dilatatum) in bloom right now 

This is the section that needs work although it is hard to see the slope in this picture. Additionally, the bricks I set in place on the uphill side have shifted over time due to tree root growth. I'll need to reset them.

This is a reverse view of the same stretch of track. You can see there is nothing holding up the track on the downhill side.

I spent the day cleaning up the stream bed, trimming back plants and putting down new balast.

The whipcord western redceder is doing fantastic. I'll need to move it as it's getting so big. I should never have planted it so close to the track. 

Alki checking out today's work.

A surprise popped up this spring—a Pacific trillium. I have no idea how this got here but I'm happy it's found a perfect home.

The bearded iris started opening this week.

The native iris are in full bloom right now as well.